Count API built with Go
Count API was an interesting service that I came across when I was starting to develop my own blog site. I wanted to somehow count the total number of page visits that I got in the simplest way possible. And this service was just so minimal and perfect for my usecase. Back then this service was available for free use but now the API seems to be broken for some reason. Before it broke, I decided to switch to firebase Realtime-Database for my usecase.
Features of Count API
Count API acted as an IaaS(Integer as a Service) which was so easy to work with since all the end points where pure get requests. It had the following features-
- Stores an integer value to a key which can be chosen by the user.
- Keys are clustered to a namespace. So if you have keys for your website, you can give the website URL as the namespace.
- Uses Redis Database under the hood.
- Each keys have a lifespan of 6 months, after which they are deleted from the database if there are no interactions with the keys.
- With
/hitendpoint, you can increment the value of a key by 1. - With
/setendpoint, you can set the value of a key if it was configured to be reset if needed. - With
/getendpoint, you can get the current value of a key. - With
/updateendpoint, you can increment or decrement the value of a key by a given number. - With
/createendpoint, you can create a new key with certain configurations which are allowed by the platform. - With
/infoendpoint, you can get all the details about a key. - With
/statsendpoint, you can get all the details about the countapi server. - You can create 10 key-value pairs from one IP at a time. This is to rate limit the users to avoid spams and DDoS attacks.
Architecture Design
Requirements
I wanted to replicate this server but with certain changes.
- I didn’t want the database to be a separate process like running Redis.
- I didn’t want to recreate all the endpoints.
- The details about a key can be just the value and the time at which it was last modified.
- I still wanted feature of removing the inactive keys after a timeframe.
Implementation Details
With these points in mind, I started laying out the pieces required to build the project.
- I started with choosing Gorilla Mux for the API Router. Gorilla Mux is the default choice when building web servers because it is feature rich and performant.
- For the database, I wanted something lightweight and more like a library that can be a part of the server. So I chose BoltDB. BoltDB is a key-value store which is famous for it’s capability to perform well with millions of transactions and for being lightweight. The value stored for each key can have the timestamp and the value converted to bytes. first 8 bytes will be for the timestamp and the rest will have the value.
Initially I created the database functions which I will require for building the server. The database had 5 functions-
- Initialise database file on startup.
- Get Value: This gets the value from 8th byte to the last.
- Set Value: This sets the value and the current day of the year to the DB. It stores the day of the year count on the first 8 bytes and the value on the rest. This also returns the previous value which was present there.
- Count Keys: This returns the total number of keys present in the DB at that point of time.
- Monitor DB: This function creates a ticker and scans the keys and it’s values for outdated ones and deletes those from the DB every day.
Once these were working well, I moved to create the API endpoints.
/get/{namespace}/{key}: This endpoint gets the value from the DB/set/{namespace}/{key}?value=xxx: This endpoint sets the value to the DB/hit/{namespace}/{key}: This endpoint increments the value of a key by 1/stats: This endpoint returns the version of the software and the total number of keys present in the db
After these endpoints were created, I ran the Monitor function on a separate go thread so that the monitoring will happen on a different goroutine. And if the server is closed, it will close the DB safely and exit.
Load Testing
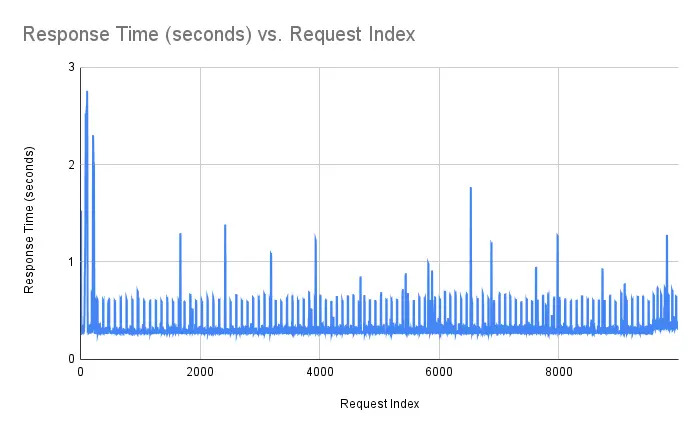
To test the performance of the API, I wrote a python script that used the requests module to fire concurrent requests at the server and note the response time. Due to performance limitations of my laptop, I chose to do 10,000 requests in total for the load testing for the time being and plotted the response time graph which is shown below. I also changed the monitoring interval to run every 5 seconds to see the spikes it will create in the response time. The highest peak shown in the graph was due to other background processes running in the system while the test was conducted. But on an average, I got around 250 ms of response time for each requests. And all the requests were unique. That means, there were 10,000 keys created in this process and each request had separate reads and writes to the DB.
